Sunday, 27 October 2013

New handle for Henry Disston D8


I bought this lovely old beauty recently while mooching around in  Joseph weld charity shop a few weeks ago here in Weymouth Dorset, £3 that was a bargain.

They had what looked like an old  Ottoman, I just happened to lift the lid (you know as you do)  just being nosy, really expecting to find it empty, or, find it full of sheet and blankets,  To my surprise, it was an old carpenters chest which had been covered to look like an Ottoman, still had all the sliding draws etc,  and full of a bit of junk that accumulates in them over the years, most of the tools were already gone.

I couldn't resist a rummage in the bottom of it, buried right at the bottom was this lovely old saw a Henry Disston D8 handsaw with a broken handle.


The Blade was true and straight it had all its teeth no broken or missing teeth either,  all cut evenly on both sides of the blade, the handle was badly broken, but that's replaceable.


The medallion inlay ed in the side of the handle is readable and the date as shown is Dec 27th 1887 Philada  ( Philadelphia)

As can be seen from the lower photo is the damaged handle, It could be repaired but I think its always going to be a weak point.

On my way back from returning my daughter and grandson back to Bristol airport I popped into Yandles of Martock near Yeovil looking for some Applewood for the new handle but never found any, Instead, I came away with plenty of Black walnuts to do the job.

Monday tomorrow I'm taking the saw in to be re-cut set and sharpened, I use to do this my self but the old eyesight not what it used to be.

I have had the handle off of this saw from the shape of the end of the blade and positioning of the brass bolts there is no way I can cut a simple slot into a new bloke of wood and then slide the blade into for positioning because of the rounded end to the blade.

I'm going to laminate the new Handle in four thin sections,   two either side then rebate out from both sections sides with a small router half the depth of the thickness of the blade to suit the shape of the end of the blade then laminate both section together., But that's another post.  Stay tuned.


Monday, 21 October 2013

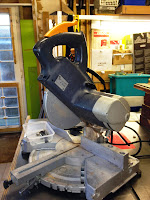
Elu ps174 TYPE a3 Mitre chop saw, A total refurbishment.

Well, this is the condition it came to me, from my son-in-law Edwin.

Parts have been ordered, but, at the moment just enough  to fire it up so I know it is still a working saw.

As soon as it is fired up, I'll strip it totally to pieces and  start a complete refurbishment here.

It appears to have a few missing parts, things like missing table extension bars, dust bag,  Allen key, blade wrench.

I have  managed to source a dust extraction hose  connector, a new  drive belt, plus the wrench, and the Allen key, I have on order two TC blades 

First of the parts arrived today and I have fitted new brushes and holders at least I now know its a runner.

No prizes for guessing as to what was wrong with it. The brushes were very simple to fit.  Shown the old brushes and holders, New brushes and holders now fitted, brush covers refitted. The trigger switch was hanging out of the handle with a muddle of wiring now sorted and refitted in position.


The ordered  Tc blade came today as well. Instead of replacing like for like, the old blade only had 24 teeth I increased the new blades to 64 teeth for a much finer finish to the cut. The drive belt I won't fit till the present one breaks.

I reassembled all parts today after fiddling here and there to work out where and how all the parts fitted which took a bit of time seeing it was already stripped apart so I didn't know how they fitted into each other,  but, as you can see it all back together.
 
As seen here an offcut of Oak 60 * 45 mm it cut spot on at 90 degrees across the gain and at 90 degrees vertically, absolutely no wobble, no signs of wear in the bearings or shaft, phew.  

I tried several other cuts with lovely clean finishes, from these cuts  I decided there is no point in stripping this saw any further, even if I were to replace all bearings and the main drive shaft it would not improve the saws cuts at all, unnecessary work and expense. I think a case of leave well alone.

All I'm going to do now is make a  simple bench to bolt it to. any ideas? 

In the shop tidying up after the re-build picked up the old blade and was going to chuck it in the bin but took a closer look at it, hmm maybe not, I scraped off some of the gunge that was baked onto the teeth, Couple of photos before and after.


Monday send it off t for re-sharpening seeing it has wear I'll keep this one for rough cutting and as a spare while the other blade is away for sharpening.