I spotted this old pine computer desk, I had been pondering of either,
waiting till we move before getting one or, making one when I have the
new workshop set up but that will be some time from now, and could really
do with it now. I know I could easily make one but, as the workshop is
in the process of being shut down, it ain't possible, to many tools
already packed away, and anyway I cant buy the timber for the price I
paid for it, not only that the money goes to a really good charity.
After some friendly bartering, I now have a slightly battered,
damaged to the fold-down false drawer sliding shelf hanging off t, plus
a lovely water stained desktop, pity I didn't take a photo of it
fully assembled first.
First the two grubby base cabinets, inside and out, not to bad inside
but, outside the woodworking finish leaves something to be desired.


I took it all straight to the workshop mainly to try and get the water
stain out of the top which to my surprise I did just that (you'll see
later. I must admit primarily it took some doing. I tried sanding it, I
ran straight into my first problem the pine stain finish was all waxy, I
don't know if it had a second coating over the years or, if it had
furniture polish worked into it over a period of time, trying to sand it
off all it did was choke up the sandpaper-like it was going out of
fashion, so out with the hand scrappers, phew, that made me puff, its
been a long time since a scrapped a top right back to bare pine.


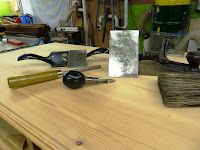
As seen above-choked sandpaper, the scraped top and I,m getting ready to
resharpen the scrapers both Stanley s first I used the No 112 for the
heavy scraping and then down to the No 80 for the finer work and then
in places a hand scraper. it had a very light sanding now the stain has
been removed, I still need to go finer.
After a closer examination of the bottom door mouldings and panel
moulding plus the drawer front joinery which I stated left something to
be desired, I have decided that after scrapping all the mouldings
around the desktop I need to speed things up a bit I'm going to spray
paint the entire desk with the exception of the top which will be
re-stained as original and the lower section sprayed probably a stone colour to help cover up the let's say poor joinery.
Any way to help clean it rather than scrapping, I,m using white spirits
and scouring pads surprise just how clean it comes up and it appears a lot of the waxy feel to the wood has gone as well drawers are now
drying I,m going to try again to sand them tomorrow let you know how it
goes.


End grains all furry and needs cleaning and sanding, top two cleaned with white spirits and a scouring pad (still wet), bottom drawer still to be done, last photo all three done top two (still wet), bottom drawer did the previous day. There now dry and ready for sanding.
Before we start sanding let us change the pad on the palm sander to a clean new one, the end grain of drawer front now sanded and smooth as it
should have been in the first place, three drawers sanded and placed
back in there places to prevent any possible damage, sanding pad after I
had finished showing very little residue left on the paper, well
pleased with that, shows the white spirits and scouring pads worked
well, its certainly saved a lot of heavy scraping.


Showing the difference between panels cleaned and still to be cleaned,
plus both doors now done and drying awaiting sanding later tomorrow maybe. Today the big scrub down of the base pedestals still the same method being used white spirits and Brillo pads. I started with the two the internal shelf's from the left-hand pedestal then onto the sliding keyboard shelf and final the pedestal itself, I am well chuffed with the results I'm getting as well.
First photo shelf's drying next you just sees my handprint on the shelf as its half cleaned and last the cleaned base unit. Tomorrow I,m
going to give the base unit a second going at.


Fingers and knuckles getting a bit stiff now so let us give the cleaning a
break, for now, I'll sand up the doors which I cleaned off yesterday.
These doors have cleaned up really well and have now been sanded as seen done with my palm sander, and are complete. When I have the other pedestals all cleaned and sanded in a few days time that will then complete the cleaning down with spirits and Brillo pads, leaving only a
final hand sanding all over. But first a trip out to fetch more sanding pads and some very fine sandpaper 240 grit.


In the last photo, it shows some damage to the inside edge of the pedestal, probably done with someones trouser leg scuffing along the edge over a period of time. Rather than splice a Piece into the edge
I,m going to rum a stopped moulding down that edge and another one down the opposite pedestal to match it. I'll show this a little later.
Only a short day today A before and after photo, One base pedestal
machine sanded and hand-sanded as well with 180 grit paper smooth, plus
both shelves from the opposite base pedestal and the sliding keyboard
shelve all sanded and finished. It's beginning to come together now,
I'll soon have to decide if it's going to be painted or stained.
I have now finished cleaning the other base cabinet today, thank
goodness all the cleaning down is now finished, with the remaining
time today I made a start on hand sanding the top section, I got it to
a stage today that has left a few imperfections in its top a few dings
and some rough grain here and there nothing serious, to be sorted
tomorrow.


I've placed pencils on the top to show where the small imperfection is,
Hopefully, they will all be sorted tomorrow then all the cleaning and
sanding will be complete.
I had to fit two new backs into the base pedestals, Originally when this desk was first made there were backs to it but somewhere along its journey, they have disappeared. I also fitted a new keyboard shelf the Original all bowed and buckled as you see in one of these photos. The two backs and keyboard shelf + the shelf that I fitted for the mouse shelf fitted into the top of the right-hand drawer are all from a half sheet of 15mm birch faces ply I had leftover from another job. Before fitting the backs and shelf's I pre-drilled the hole for
electric cables and finger hole to the mouse shelf.
I have also rebated two mouldings down both front inner edge to both
pedestal to remove that damaged edge I showed you
earlier.


I don't like flush styles brass hinges that are just screwed flush to
the surface with no adjustment on setting the gap down the edge of the
doors, I popped into B/Q early yesterday morning and bought 2 pairs of
50mm brass hinges supplied with brass screws, haha. what a joke they
are.
As seen below, as soon as I opened the packets I knew these doors would
be hinge bound (meaning that when you try and close the door it will
spring back at you because when the hinges have closed the screws that
were supplied with the heads are to big for the countersink in the flap of the hinges and come in contact with the opposite screw head the
flaps need re-drilling to suite the screw heads so the heads sink in to
the hinge flush.) I decided to fit them anyway just to show what i
mean.


The photo on the right the cent-re hole has been re-counter sunk to
suite the screw head.
Both doors have been rehung using the new hinges, both internal shelves
have been fitted in a new position. The left pedestal had two shelves
originally but I intend to place my printer in that side, I removed
one shelf and lowered the other one to suit, the now spare shelf is now
fitted in the right-hand pedestal.


This now leaves the fold-down drawer front as seen in the photo,
laying on the desktop. I have to make a new front for it as it has a
bad twist in its length to much to attempt to plane it out.
Top shelf in the right-hand pedestal No prizes for guessing at what's going on it, and more than possible under it as well.
It's now all rebuilt and finished ready for the finish, I'm still not
sure to either paint it or get some antique polish for it hmm.


Some of you who read the original posting here may find some changes from here onward, unfortunately, this post decided to go walkabout and disappeared for nearly a week totally vanished.
Luckily some very clever people located it for me, I managed to restore it here, but, unfortunately, the last few paragraphs and photo s were missing so I have had to rewrite it from here on my apologizes to you all.
Well here we go again, I decided to paint it, in the end, I used acrylic emulsion it is not white its stone-coloured three coats, it looks great.
I only painted the base units and drawer unit section. The top I decided to stain and polish, no varnish, the stain was an antique pine two coats just wiped off with a rag, then two coats of sanding sealer followed by two coats of pal polish from Mylands. Just to add that bit extra I decided to stain and polish all the knobs to match the top I felt it gave that bit more to the finished styling to the desk.
I loved the polished finish but need must, the top soon disappears under the all the other bits and pieces still to be added to the desktop.
Here it is now finally finished. I hope you enjoyed this post, feel free the leave any comments you like.


